(Vegan) French Vanilla Chai Tea Entremet
 |
Ingredients:
For the Joconde & Joconde Decor Paste*:
For the Joconde & Joconde Decor Paste*:
I based this recipe off of Vegan Vistor's L'Opera Cake, with just a few tweaks
- 1 cup ground almonds
- 1/4 cup + 2 tablespoons confectioners sugar
- 3/4 cup whole wheat pastry flour
- 1 1/4 cups almond milk
- 1 teaspoon baking soda
- 1 teaspoon baking powder
- 1 tablespoon vinegar
- 1/4 cup + 2 tablespoons confectioners sugar
- 3/4 cup whole wheat pastry flour
- 1 1/4 cups almond milk
- 1 teaspoon baking soda
- 1 teaspoon baking powder
- 1 tablespoon vinegar
*for the paste, add 2 tablespoons cocoa to 1/2 cup joconde batter
For the French Vanilla Chai Tea Pastry Cream:
- 1.5 cups almond milk
- 1/4 cup French Vanilla (vegan) creamer
- 4 French Vanilla herbal tea bags
- 1/2 cup AP flour
- 1.5 tablespoons cornstarch
- 1/3 cup sugar
- Dash salt
- A few shakes cinnamon and cloves
- A few shakes cinnamon and cloves
- 1/2 teaspoon vanilla
Fancy Tools Needed:
- A Silpat or other non-stick baking mat
- A springform pan
- Piping supplies, whether they be "serious" or a plastic bag with a corner cut off
Method:
1. Start with your joconde, as it will need time to harden in the freezer. Grab three bowls: add the dry ingredients to one, and stir to combine.
2. In the second bowl, wisk together the almond milk and vinegar. Then, add to the dry mixture in batches. Mix, but do not overmix! It will look like pancake batter.
3. Steal about 1/2 cup batter and place it in the third bowl. This is your makeshift decor paste that will be used to pipe your design. Add the cocoa OR coloring of your choice, wisk, and set aside.
4. Place your Silpat on an ungreased baking sheet (and if you'll be doing an elaborate pattern, throw your design under the Silpat to trace, but remember to remove it before baking!). Assemble whatever you'll be using to pipe, and fill the bag with your decor paste.

5. Pipe your design(s) on the Silpat, and toss in the freezer for 15-25 minutes (to harden). Once this time passes, cover the design with the rest of the batter and throw back in the freezer. This time for 30 minutes.
6. While your design freezes, make your pastry cream (or other filling)! For mine, I warmed the milk in a saucepan over medium- heat, and steeped four bags of herbal tea. Once the milk was flavored yum-fully, I added the sugar and salt.
7. Continue to stir while you add the flour and cornstarch + wisk to thicken. Don't stop, or it'll stick!
8. Cover with wax paper (literally on the top of the cream, or it'll grow a lovely film!), and refrigerate.
9. Preheat your oven to 400ºF.
10. Bake your joconde for roughly 10 minutes. It's done once it is golden brown in color, and the edges seem to come away from the mat. Allow time for it to cool.
11. Once cooled, flip the baking sheet onto a powdered-sugar or floured (or non-stick) surface. The design will be facing up.
12. Measure your springform pan. Or, if you're lazy like me, guess how much you'll need to fill the outside ring of the mold, and cut parchment paper to fill the sides:
 |
| Photo courtesy of Astheroshe |
13. Now, cut the cake into those measured-out sizes, and press the strip onto the edge of your pan. You may also opt to cut out a circular bottom of cake:
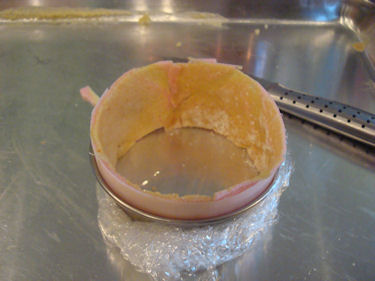 |
| Photo courtesy of Astheroshe |
Oh, and if you choose a smaller cake like I did, you'll have plenty of extra (super yummy) cake to dip in your coffee:

So, what would I change?
1. I would be sure to really, really grind down my almonds. I loved the little bits I left in, BUT! it made it impossible to pipe. I ended up actually busting the bag I was using, and had to settle for squiggles from a spoon instead of the fun, elaborate design I had originally envisioned.
2. I would make a light mousse filling. Don't get me wrong, this pastry cream is great. However, something about the two together is a little heavy and awkward for me. I think the cream would be better for a crostada or maybe a beignet, while a light mousse would really make this dessert. An espresso one would be AMAZING.
3. I would not use clumpy confectioners sugar to top it! LAZY!


I like the looks of your final Entremet. If I hadn't read the post I would've never found out about the clumpy sugar ;o)
ReplyDeleteSo fancy! I think it turned out rather well, considering all the techniques involved.
ReplyDeleteThis looks great! Kinda fancy like Erin said, but I'm sure it was more than worth the work. And it makes my mouth water.
ReplyDeleteIf you want to see some other cool recipes though, check out http://www.draxe.com. It's great!
Woah is that ever fancy looking! It doesn't sound to sweet for me... but then again, nothing is. :)
ReplyDeleteBeautiful! This challenge almost tempted me to come out of unofficial DB retirement... But then, the whole not-a-moment-to-even-breathe thing prevented me from trying. At least I can live vicariously through your lovely creation here.
ReplyDeleteMy sister recommended this blog and she was totally right keep up the fantastic work!Bakery Equipment
ReplyDelete